
Looking for easy Christmas ornaments to make? Try these frosted wood snowflakes—simple, budget-friendly, and perfect for any rustic holiday tree.

How to make DIY Frosted Wood Snowflake Ornaments
This post contains some affiliate links for your convenience. Click here to read my full disclosure policy.
If you’re looking for a super quick, super satisfying holiday craft, these DIY frosted wood snowflake ornaments are exactly what you need. I picked up a packet of wood cut-out snowflakes (mine came in an 8-pack), grabbed a bit of stain and chalk paint, and honestly—this came together in no time at all.
These rustic-meets-frosted ornaments have that warm, woodsy vibe with just the right touch of winter magic. And the technique is so easy, you can crank out a whole set in a single nap time, or in my case… while the kids hang out with grandma and grandpa.

Let’s make some pretty snowflakes!
Video Tutorial: DIY Frosted Wood Snowflake Ornaments
Watch this quick video to see how this craft came together:


DIY Frosted Wood Snowflake Ornaments
Looking for easy Christmas ornaments to make? Try these frosted wood snowflakes—simple, budget-friendly, and perfect for any rustic holiday tree.
Materials
- Packet of 8 wood cut-out snowflake ornaments (Dollar Tree or similar)
- Wood stain of choice (I used FolkArt Gel Stain, Oak)
- White chalk paint (I used Rust-Oleum)
- Twine hangers (often included in the ornament packaging)
- Small scrap of clean dish sponge (or a small stencil brush—whatever you prefer)
Tools
- 1-inch flat paintbrush
- Paper towel or scrap paper for blotting excess paint
- Protective craft mat or parchment paper
Instructions
- Watch video. Follow the tutorial for a step by step walkthrough on how to make your own snowflake ornaments.
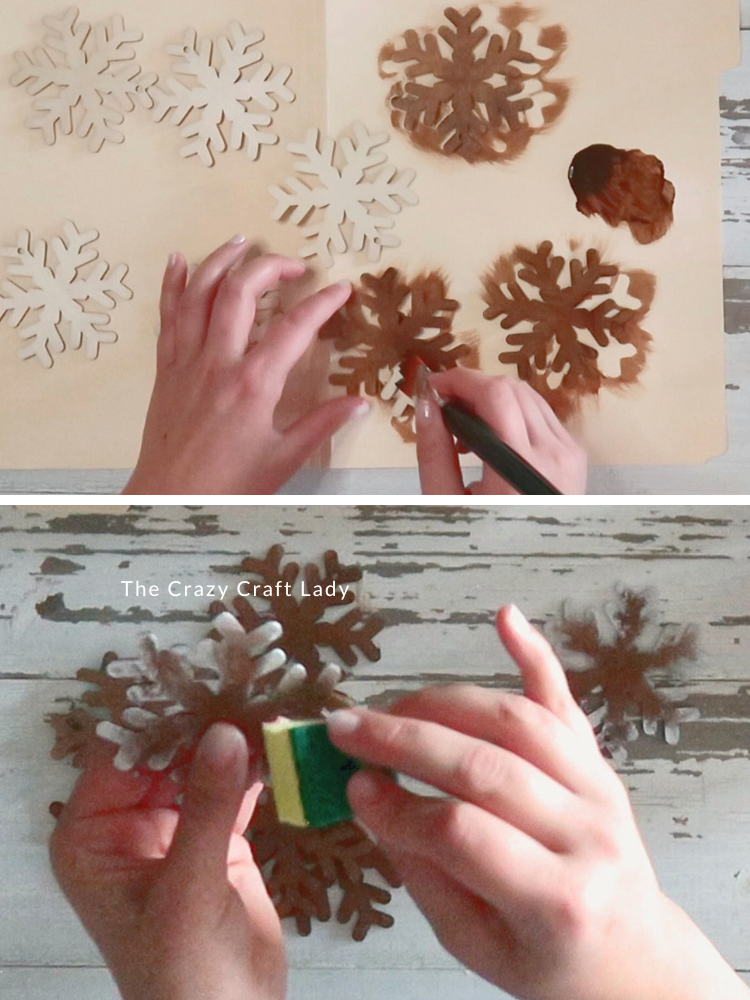
- Prep the Snowflakes. Lay out all eight wood snowflake ornaments on a protected surface. Make sure any packaging is removed (…even though I completely forgot the built-in twine hangers existed—more on that later!).
- Apply the Wood Stain. Using your 1-inch flat brush, apply stain in a very specific direction to avoid goopy buildup: Work one snowflake section at a time (each snowflake has six branches); Start in the center and brush outward only; Continue center → outward on each section. This prevents stain from pooling in the tiny cutout details, which would slow down drying time and make things look muddy. Let the stain dry completely.

- Add the Frosted Edges. Tear off a tiny piece of clean dish sponge and dip it lightly into your white chalk paint. Tap off the extra paint onto scrap paper—you want barely anything left on the sponge. Gently dab only the outer tips and edges of each snowflake branch. Skip the center—just frost the details for that fresh-snow effect. It creates a soft, cozy, rustic winter look without covering up the pretty wood grain.
- Add the Hangers. Once everything is dry: Cut twine into 8-inch pieces (if needed). Thread through each ornament and knot to create the hanger.
- Hang and Enjoy. That’s literally it! These come together in a flash, and they look so cozy and handmade on the tree.
The finished craft

These DIY frosted wood snowflake ornaments might be the quickest Christmas craft I’ve made all season—but they’re also some of the cutest. With simple supplies and a really forgiving technique, you can whip up a whole set for your own tree or make extras for gifting.
PIN these DIY Christmas ornaments for later:

Crafting with Dollar Tree Christmas Wood Cutouts
This craft was part of a compilation video over on my YouTube Channel, along with: Mini snowman Decorative Tray, Red Pickup Truck Floral Display, North Pole Arrow, Gold Frame Christmas Ornaments, Christmas Tree Farm Hanging Sign, DIY Sled Ornament, Gingerbread House Display, and Tin Tile Christmas Tree.