
Turn old tin cans into charming snowman top hats with this easy winter craft! Two cozy upcycled DIYs using basic supplies and simple techniques.

How to make decorative snowman top hats out of upcycled tin cans.
This post contains some affiliate links for your convenience. Click here to read my full disclosure policy.
Just because Christmas is over doesn’t mean winter crafting has to stop… and today’s project is proof of that.
I’m turning everyday tin cans (yes, even those giant coffee cans and soup cans) into snowman top hat decor that looks straight out of a cozy winter catalog. This project was completely unplanned, 100% experimental, and honestly… those are always my favorite ones!
If you’re snowed in, stuck inside, or just itching for a creative winter upcycle, this craft is for you.
Video Tutorial: Tin Can Snowman Top Hat Centerpiece
Watch this quick video to see how these crafts came together:

Upcycled Tin Can Snowman Top Hat Centerpiece
Learn how to make adorable snowman top hats from recycled tin cans. A budget-friendly winter craft perfect for farmhouse and Christmas decor.
Materials
- Upcycled tin cans: 1 large (coffee can size) and 1 medium (28 ounce size)
- Dollar Tree burner covers (2), (or heavy cardstock, plastic plates, chargers, etc.)
- Chalk paint: Black (FolkArt Chalk Paint) and Moss Green (Waverly Chalk Paint)
- Faux greenery & berries
- Faux pine sprigs & mini pinecones
- Ribbon assortment
- Twine
- Paint for distressing: light brown and white
- Small battery-operated red candle
Tools
- Paintbrushes
- Hot glue gun & glue sticks
- Scissors
- Dish sponge or pouncer brush
- Blow dryer (optional)
- Lighter (for heat-sealing ribbon ends)
Instructions
- Watch the video. Follow along with the video tutorial for a step-by-step walkthrough of how to make your own snowman top hat crafts.
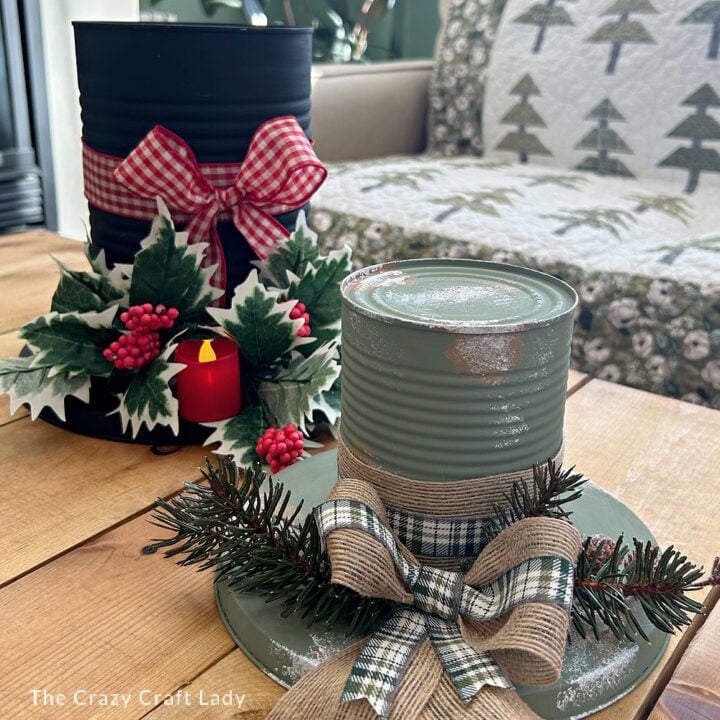
- Paint Your Cans. Paint the large can black and the medium can green. Cover sides and bottoms (they’ll be flipped upside-down later). Use a blow dryer on cool to speed drying, and add a second coat, if needed.
- Create the Hat Brims. Paint the large burner cover black and the small burner cover green. Once dry, place each can upside-down in the center of its burner cover to form the hat shape. TIP: Do not glue them together — easier storage later!
- Black Hat Greenery Decoration. Create greenery bundle, with spring pointing in two directions. Secure in center with twine. Add red battery candle.
- Black Hat Ribbon Decoration. Wrap wide check ribbon around base of can. Fold ribbon end before gluing to prevent fraying. Make simple bow using bunny-ear method, create kite-tail ends, and heat seal with lighter. Adjust bow placement higher for balance.
- Distress the Green Hat. Lightly dab light brown paint with sponge. Let dry. Layer white paint over same areas to mimic falling snow.
- Green Hat Ribbon & Bow. Wrap natural fiber ribbon around base. Layer thin plaid ribbon on top. Make a figure-8 bow with two pieces of layered ribbon. Pinch center, and wrap with thin ribbon. Create layered ribbon tails and glue under bow.
- Embellish Green Hat. Tuck faux pine & mini pinecones behind bow. Secure with hot glue.
- Final Styling. Set each hat on its brim, fluff greenery, and enjoy your cozy winter snowman decor ❄️
The Finished Craft

These snowman top hats turned out even better than I imagined: cozy, charming, and made from items most of us already have lying around. This is the kind of project that keeps winter crafting fun long after Christmas is packed away.
If you’re snowed in, craving creativity, or just love a good upcycle… this one’s a winner.
PIN this snowman top hat craft for later:

Super cute. Easy to personalize to fit your home decor.