
Turn simple Easter egg cutouts into whimsical bunny decor with this easy Dollar Tree DIY.

How to make a whimsical spring Easter bunny craft from egg cutouts.
This post contains some affiliate links for your convenience. Click here to read my full disclosure policy.
Sometimes Pinterest shows you something so cute you just have to try it yourself. That’s exactly what happened with this craft!
I kept seeing these adorable Easter bunnies made from egg cutouts popping up in my Pinterest feed, and I finally decided to give it a try. The result? Possibly one of my favorite spring crafts I’ve made in a long time.
These whimsical little bunnies use simple Dollar Tree egg cutouts, a few craft basics, and a little creativity. The wire glasses and twine ears give them so much personality. And once you make one, you might just want to make a whole bunny family like I do!
Let’s get crafting.

Video Tutorial: Dollar Tree Mini Wood Crate Easter Decor
Watch this quick video to see how this craft came together:

Pinterest Made Me Do It: DIY Easter Bunny Decor from Egg Cutouts
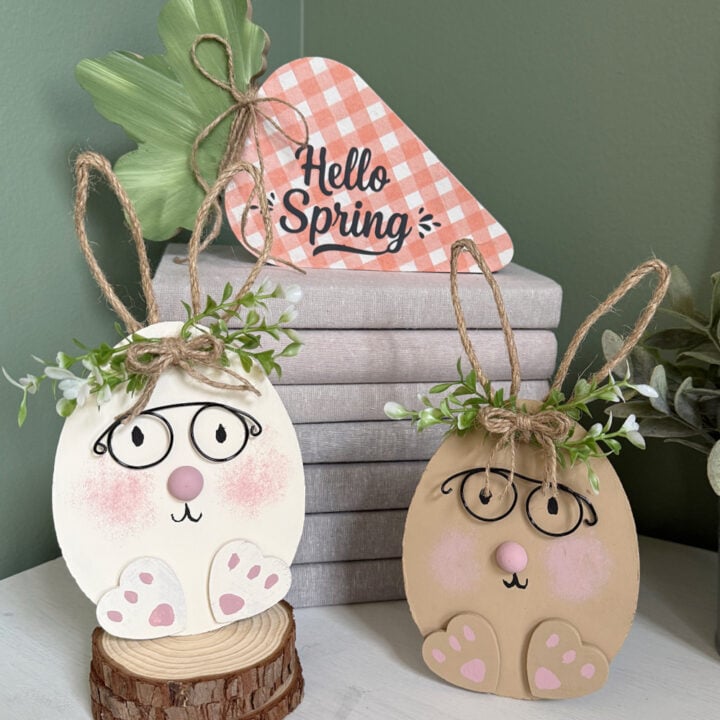
Easter Egg Bunny Craft
This budget-friendly Pinterest-inspired Easter bunny craft uses egg cutouts, wooden hearts, and wire glasses for the cutest spring decoration.
Materials
- Thick cardboard Easter egg cutouts (Dollar Tree or handmade)
- Acrylic craft paint: FolkArt Matte Vintage White, FolkArt Matte Country Twill, light pink, and black
- 15 mm wooden half beads
- Wooden heart cutouts (about 1½ inches)
- Thick black craft wire (jewelry section)
- Wired jute twine (Dollar Tree)
- Faux greenery
- Twine
- Small wooden cube blocks
Tools
- Paint brushes (including fine detail brush)
- Pouncer or stencil brush
- Hot glue gun
- Wire cutters
- Pliers
- Masking tape
- E6000 adhesive
Instructions
- Watch the video. Follow along with the video tutorial for a step-by-step walkthrough of how to make your own Easter bunny egg decorations.
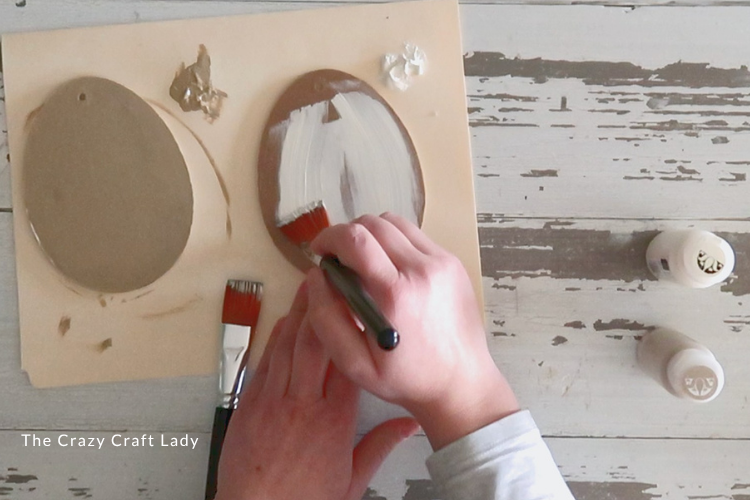
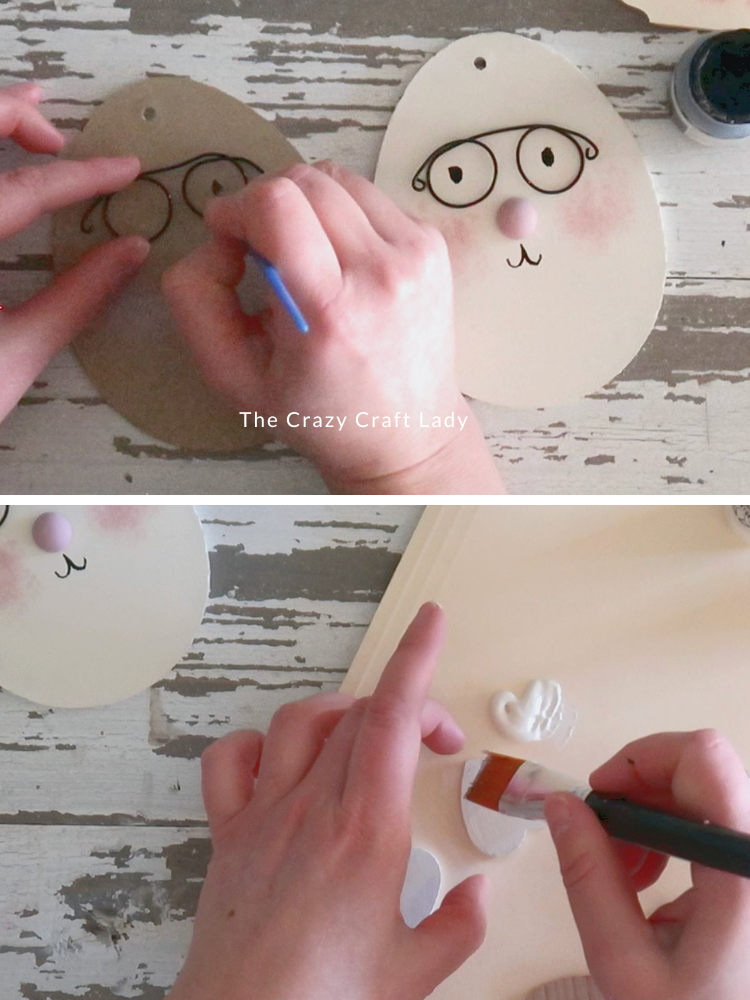
- Paint the Egg Cutouts. Start with two thick cardboard Easter egg cutouts. Remove any hanging strings or loops. Paint one egg cream and one egg tan. Paint the front, back, and edges. The cardboard front may need two coats, while the coated back usually covers in one coat. Let dry between coats.

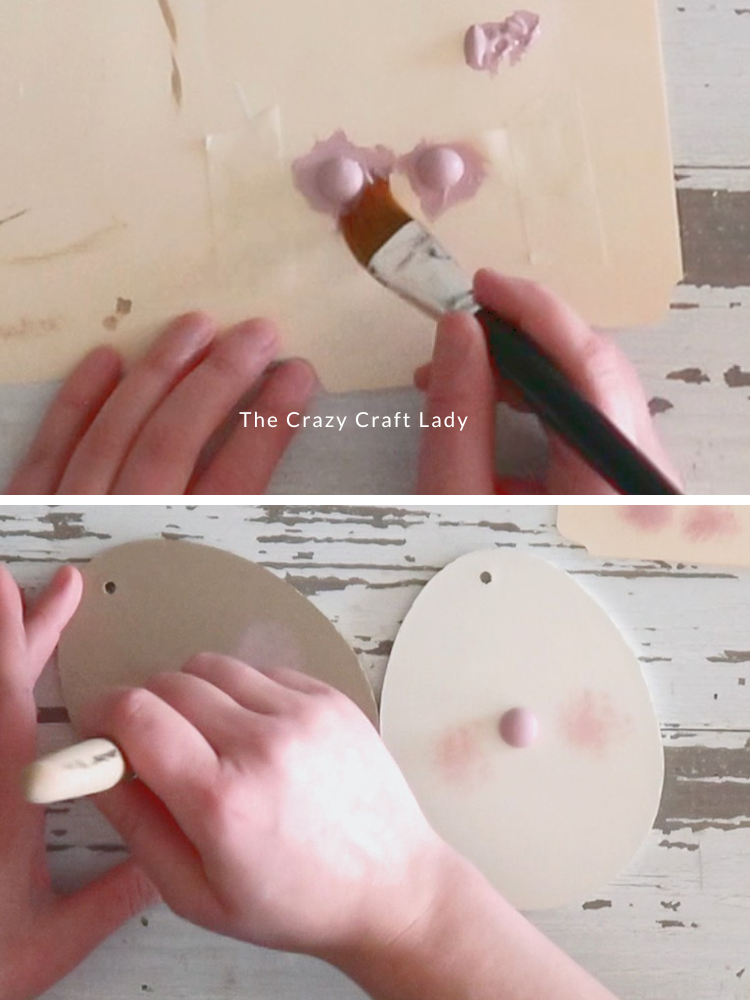
- Create the Bunny Nose. Place masking tape sticky-side up on scrap paper and press the ends down. Stick 15 mm wooden half beads onto the tape and paint them light pink. This keeps them steady while you paint the edges. Once dry, hot glue one bead to the center of each egg to create the bunny nose.

- Add Bunny Cheeks. Dip a pouncer brush into the pink paint and remove most of the paint so the brush is very dry. Lightly pounce a soft blush circle on each side of the nose.
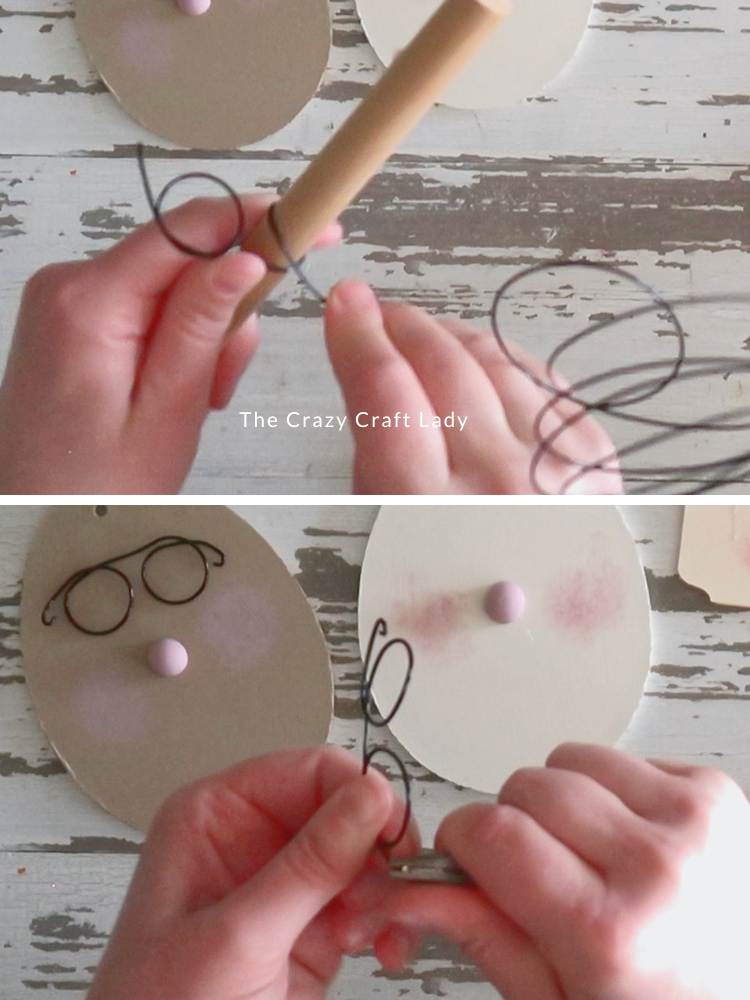
- Make the Bunny Glasses. Using thicker craft wire, wrap the wire around a 2-inch wooden dowel to create two loops. These loops will become the bunny’s glasses. Use pliers to curl the wire ends inward so they look finished and polished. Set the glasses aside for now.
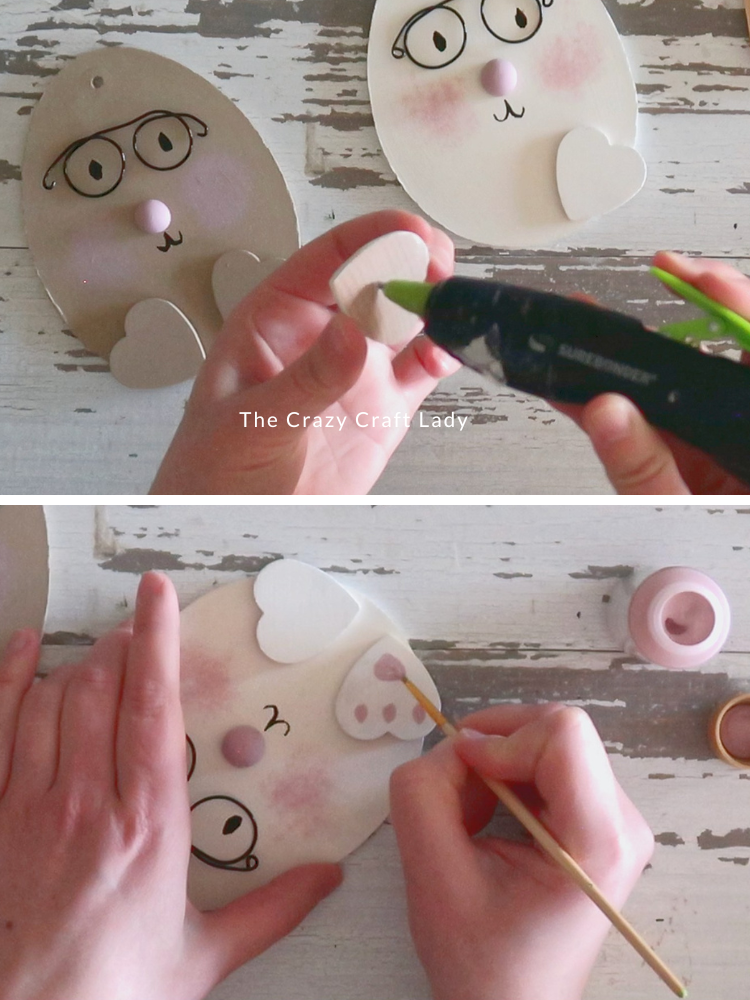
- Paint the Bunny Eyes. With a fine paintbrush and black paint, paint two small oval eyes. Position them so they will sit nicely inside the wire glasses later. Add a simple swooping line under the nose for a little mouth.
- Create Bunny Feet. Paint four wooden heart cutouts to match the bunny colors. Once dry, glue two hearts to the bottom of each egg to create bunny feet. Use pink paint to add three small oval toes and one larger pad shape.]
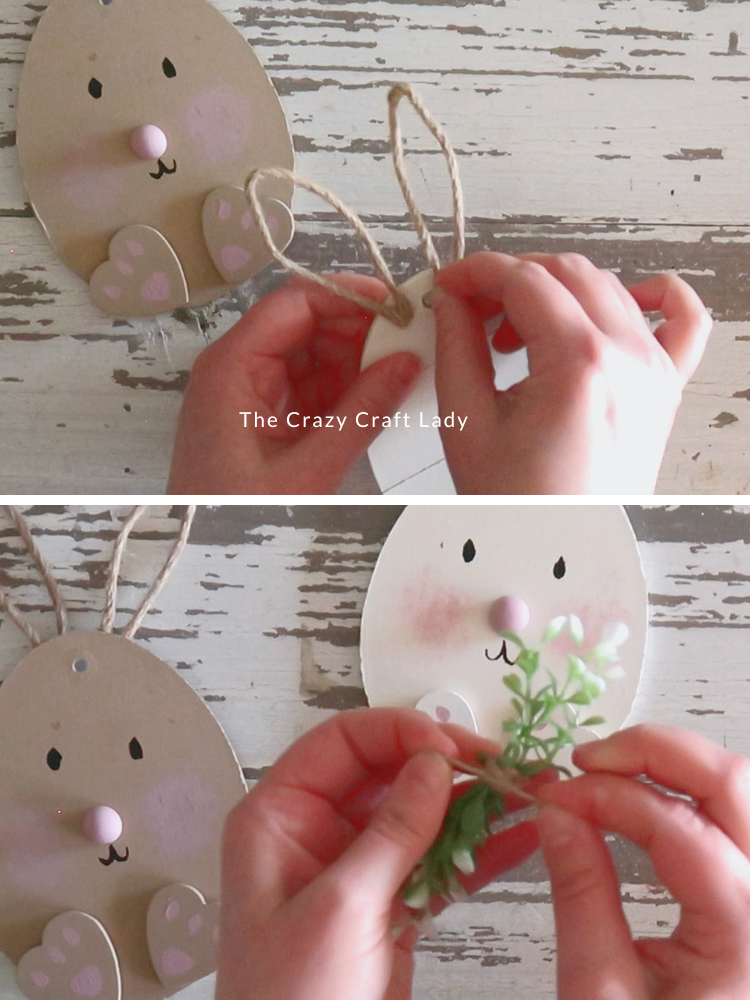
- Make the Bunny Ears. Cut four equal pieces of wired jute twine, about 6 inches long. Fold each piece in half and pinch the top to create a point. Gently bend the sides outward to form bunny ear shapes. Hot glue the ends to the back top of the egg cutout so the ears stick up above the bunny’s head.
- Add Greenery. Because the egg originally had a hanging hole at the top, we’ll cover it with a small decoration. Bundle a few tiny pieces of faux greenery together and tie the center with twine to create a small bundle. Hot glue the bundle to the top center of the bunny’s head.
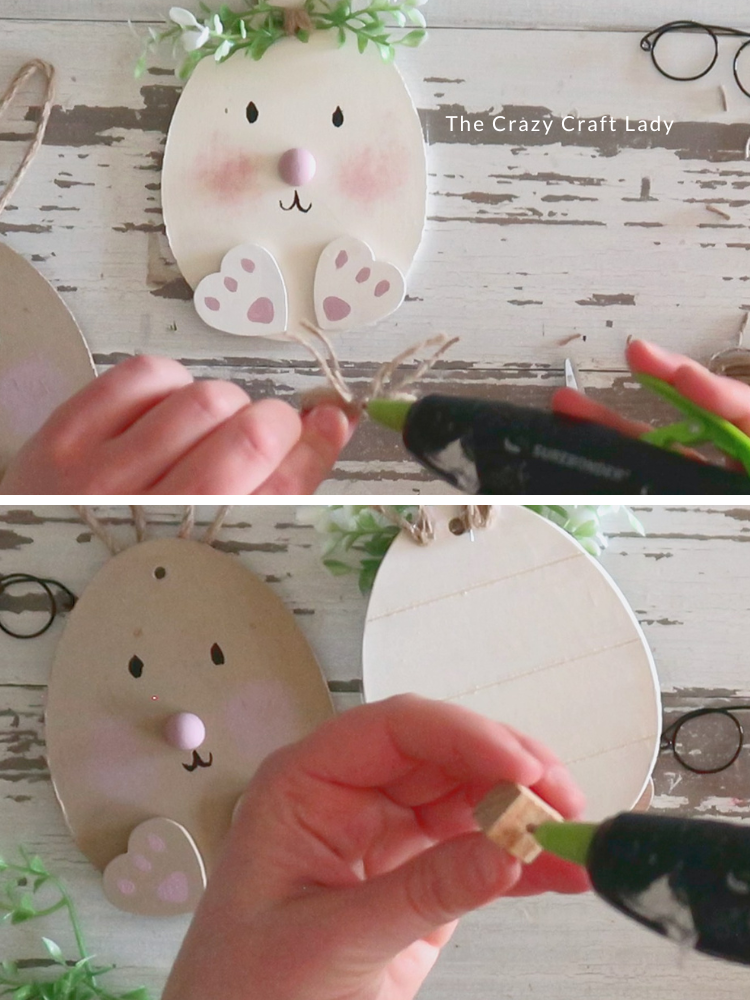
- Make a Twine Bow. Wrap twine around two fingers three times to create loops. Pinch the center and tie another piece of twine around the middle to create a figure-eight bow. Trim the ends and glue the bow onto the greenery bundle.
- Add a Stand. Glue a small wooden cube block to the back bottom of the bunny so it can stand upright. Test the placement before the glue sets to make sure the bunny balances.
- Attach the Glasses. Add a tiny dab of E6000 adhesive to the parts of the wire glasses that touch the bunny’s face. Press them into place and allow the glue to fully cure.
The finished Easter bunny craft

Oh my gosh, you guys. I absolutely love how these turned out.
The little wire glasses, twine ears, and tiny bunny feet give these so much personality. They’re whimsical, a little quirky, and totally Pinterest-worthy.
I’m already thinking about making more in different sizes so I can have a whole bunny family sitting on my mantel for Easter.
PIN this Easter craft for later:
