
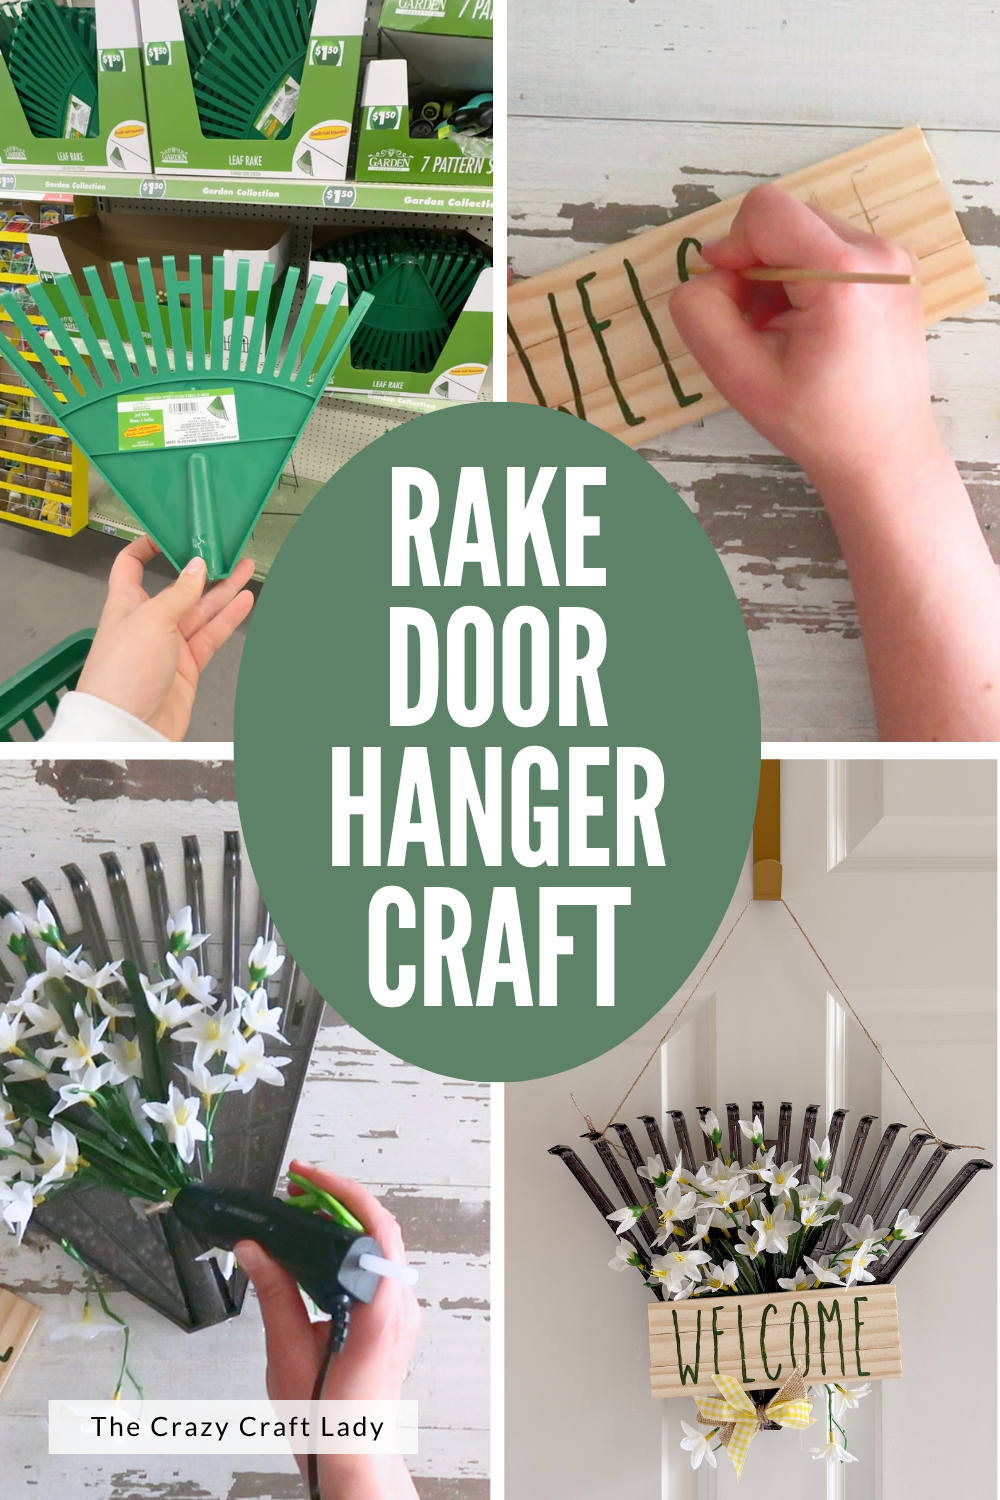
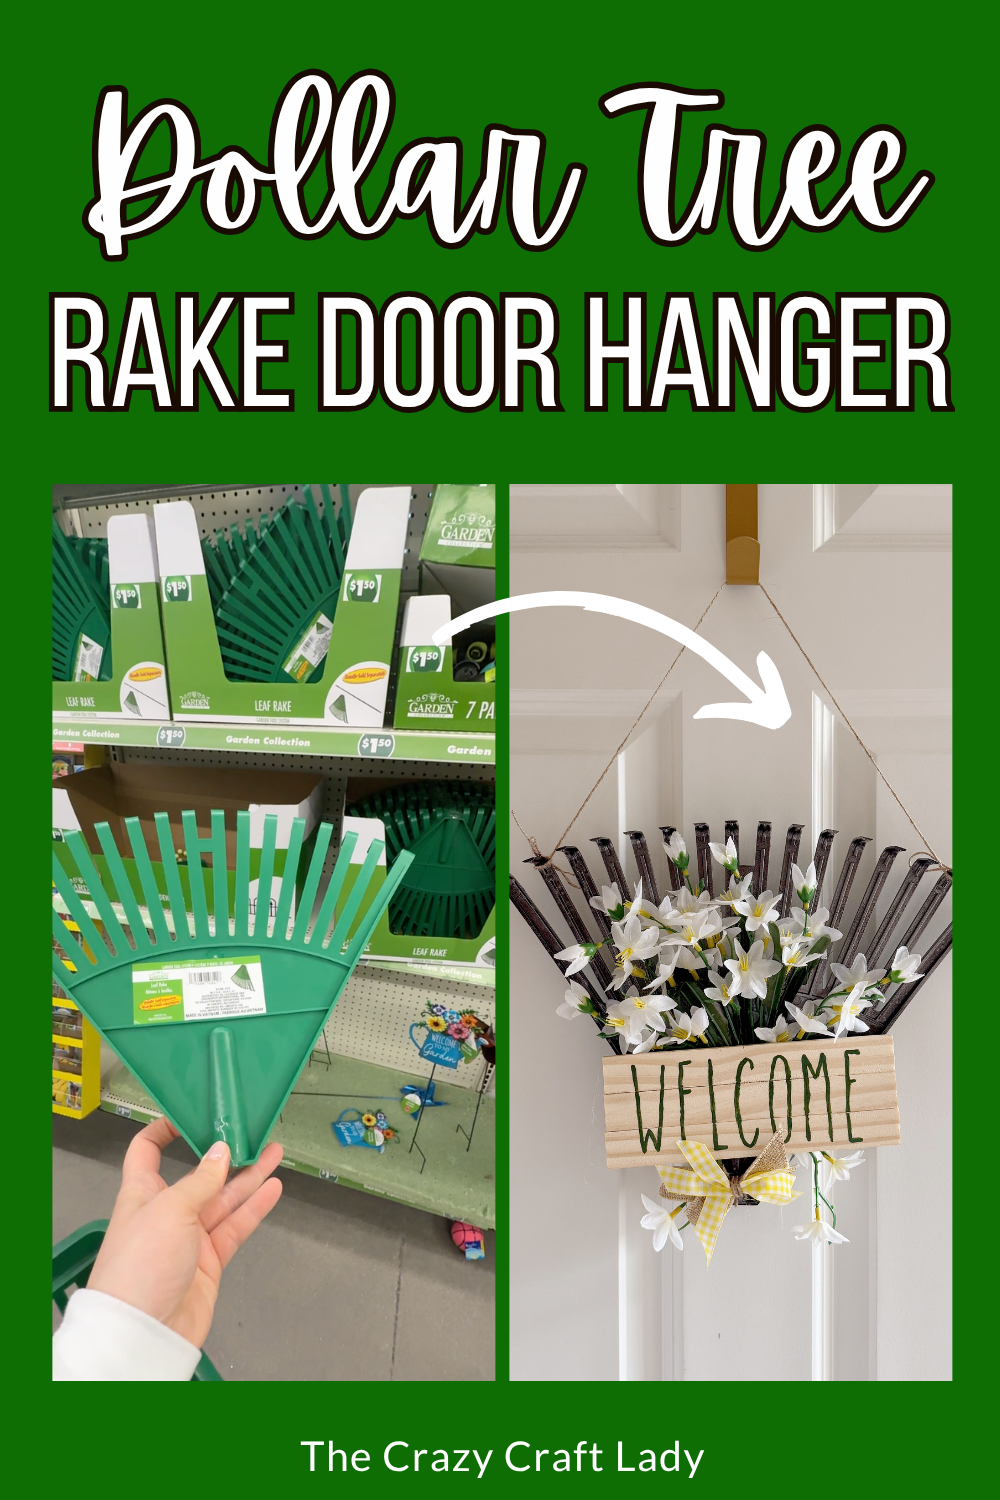
Turn a Dollar Tree plastic rake into a charming farmhouse-style door hanger! This easy spring and summer DIY uses paint stir sticks, faux flowers, ribbon, and a handmade welcome sign.

This post contains some affiliate links for your convenience. Click here to read my full disclosure policy.
How to make a DIY Rake Door Hanger with simple dollar store supplies.
Who knew a plastic Dollar Tree rake could become such a cute front door decoration? This fun and unexpected upcycle transforms a simple garden tool into a charming floral welcome sign that’s perfect for spring, summer, or even a garden shed door.
This project is incredibly budget-friendly and uses supplies you may already have in your craft stash. With a little spray paint, a handmade wood sign, and some faux flowers, you’ll have a unique door hanger that looks much more expensive than it actually is.
Video Tutorial: DIY Rake Door Hanger
Watch this quick video to see how this craft came together:


DIY Rake Door Hanger
Looking for a unique Dollar Tree garden craft? Learn how to transform a $1 plastic rake into a beautiful floral welcome door hanger with this simple step-by-step tutorial.
Materials
- Dollar Tree plastic rake
- Dark bronze spray paint
- 3 paint stir sticks
- Carbon transfer paper
- Printed "Welcome" template
- Green acrylic craft paint
- Faux flowers
- Twine
- Burlap ribbon
- Yellow and white check ribbon
- Hot glue sticks
- E6000 adhesive
- Wood glue
Tools
- Miter shears
- Paintbrush
- Fine-tip paintbrush
- Wire cutters
- Hot glue gun
- Scissors
- Pencil or tracing stylus
Instructions
- Watch the video. Follow along with the video tutorial for a step-by-step walkthrough of how to make your own garden rake door hanger.
- Paint the Rake. Start by spray painting the Dollar Tree plastic rake with dark bronze spray paint. Allow it to dry completely before moving on to the next step. You can certainly leave the rake green if you prefer, but the dark bronze finish gives the project a more rustic, farmhouse-inspired look.

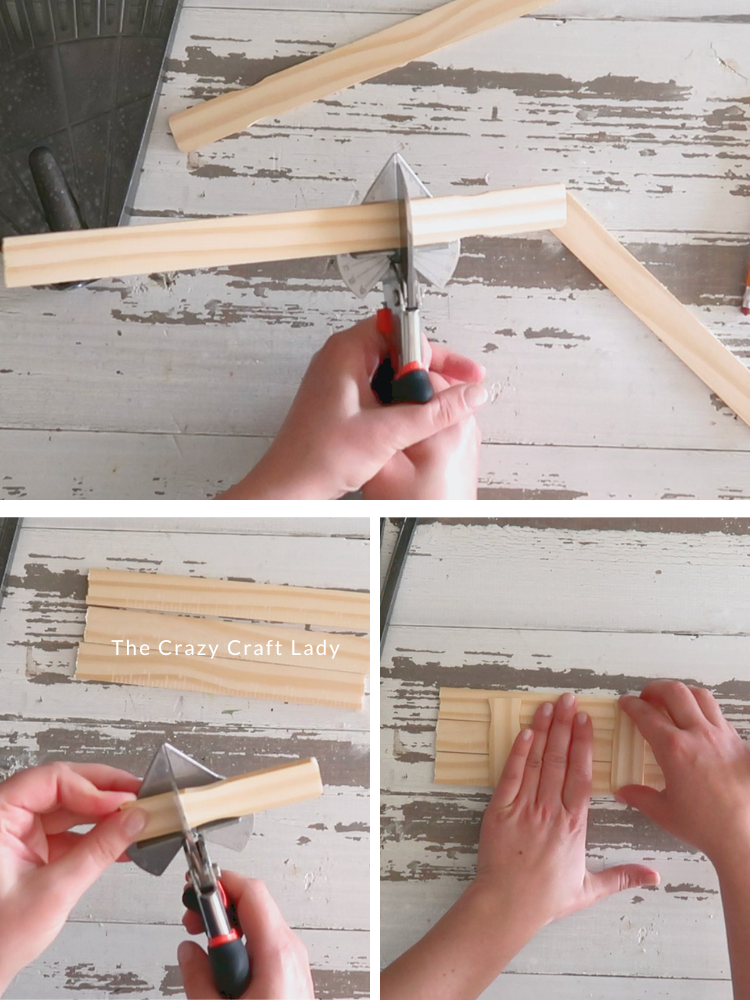
- Create the Wooden Sign. Cut the handles off three paint stir sticks so they are all the same length. Using two of the discarded handle pieces, trim them down slightly to create support braces for the back of the sign. Lay the three stir sticks side-by-side and glue the braces across the back using wood glue. Allow the glue to dry completely. You now have a simple slatted wood sign.

- Transfer the Design. Print the word "Welcome" (or any phrase you'd like) and place carbon transfer paper between the printout and your wooden sign. Trace over the letters with a pencil or tracing stylus to transfer the design onto the wood. If you own a Cricut machine, vinyl lettering would work beautifully here as well.
- Paint the Lettering. Using green acrylic paint and a fine-tip paintbrush, carefully paint over the transferred lettering. Thin, simple fonts tend to be easiest to hand paint, but use whatever style fits your decorating aesthetic. Allow the paint to dry completely before continuing.
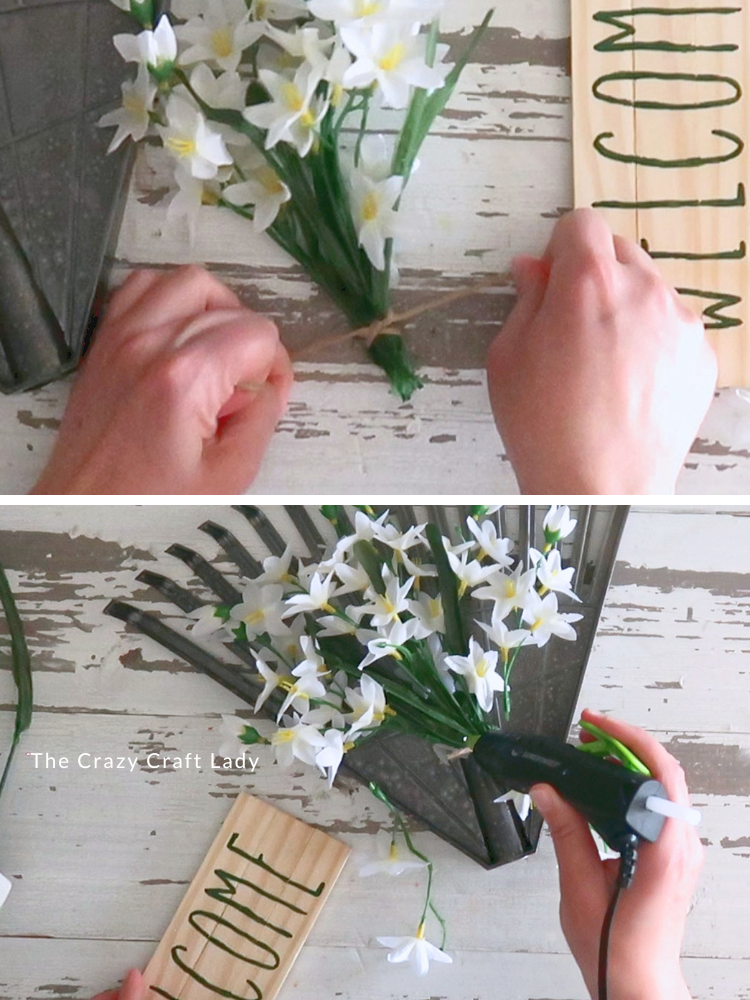
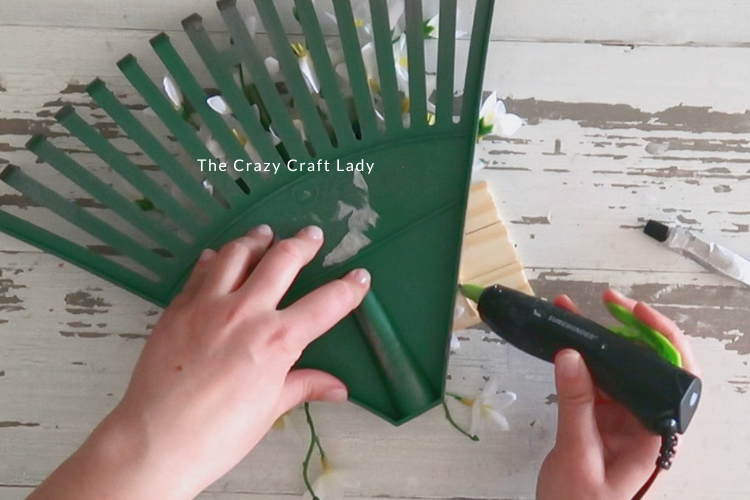
- Create the Flower Bundle. Trim the stems from your faux flowers using wire cutters. Gather the flowers into a small bouquet and secure them with twine, tying a double knot around the stems.
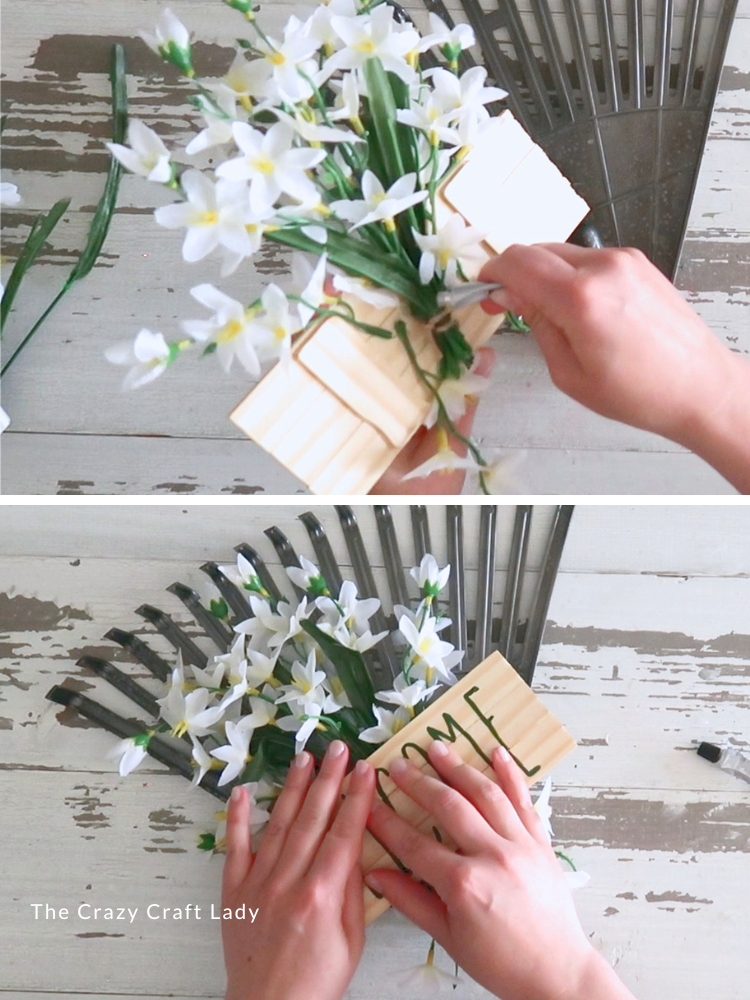
Place the flower bundle behind the wooden sign and adjust until you're happy with the arrangement. For a fuller look, tuck a few extra floral sprigs beneath the bottom of the shovel so flowers peek out from both the top and bottom. - Attach the Flowers. Hot glue the flower bundle to the back of the wooden sign. Next, apply a generous amount of E6000 adhesive to the back of the flower bundle and press the entire assembly onto the front of the rake. To reinforce the connection, flip the project over and add a generous bead of hot glue anywhere the rake touches the wood sign. Allow everything to dry thoroughly before handling.
- Make the Bow. Cut 2 pieces of burlap ribbon and 3 pieces of yellow and white check ribbon. Layer the ribbon pieces together and pinch them in the center. Wrap twine around the middle several times and tie securely. Fluff the loops and trim the tails at a diagonal for a finished look. Hot glue the bow to the bottom of the wooden sign.
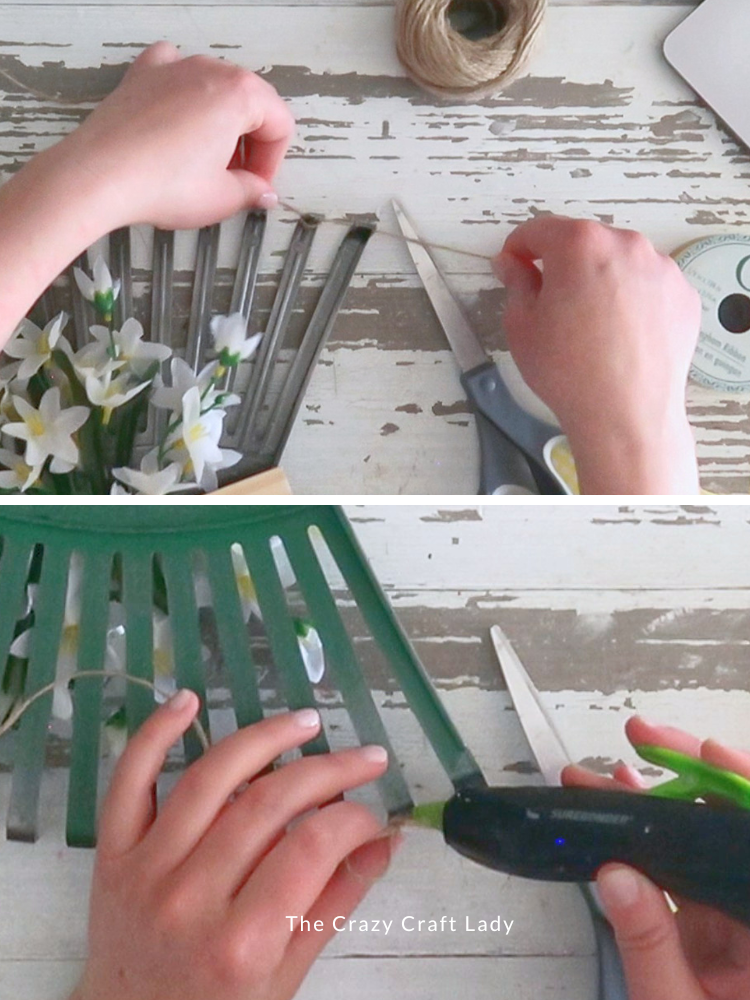
- Add the Hanger. Cut a length of twine and tie each end around the outer rake tines to create a hanging loop. Since the twine may slide along the rake, add a small dab of hot glue at each attachment point to keep it securely in place.
- Display Your New Door Hanger. Once all adhesives have fully cured, hang your new rake door hanger on your front door, porch, garden shed, or even inside your home as seasonal decor.


The Finished Craft
I absolutely love crafts that make people say, “Wait… that’s made from what?” This Dollar Tree rake door hanger definitely falls into that category! It’s an inexpensive project with plenty of farmhouse and cottage-style charm, and it’s a great way to decorate your porch for spring and summer without spending a fortune.

If you enjoy creative Dollar Tree transformations, this is one project you’ll definitely want to add to your crafting list. Happy crafting!
PIN this Rake Door Hanger for later:
More Garden-Inspired DIY Projects You’ll Love
If you enjoyed this project, be sure to check out these other creative DIY decor ideas: