
Make a beautiful DIY Easter centerpiece using Dollar Tree mini wood crates, decoupage eggs, and faux florals. A budget-friendly spring decor idea!

How to make a Mini Crate Easter Centerpiece with simple dollar store supplies.
This post contains some affiliate links for your convenience. Click here to read my full disclosure policy.
Looking for a budget-friendly spring centerpiece that looks way more expensive than it actually is? This adorable DIY Easter centerpiece made from Dollar Tree mini wood crates is one of those projects that looks complicated—but it’s really just paint, glue, and a little creative problem solving.
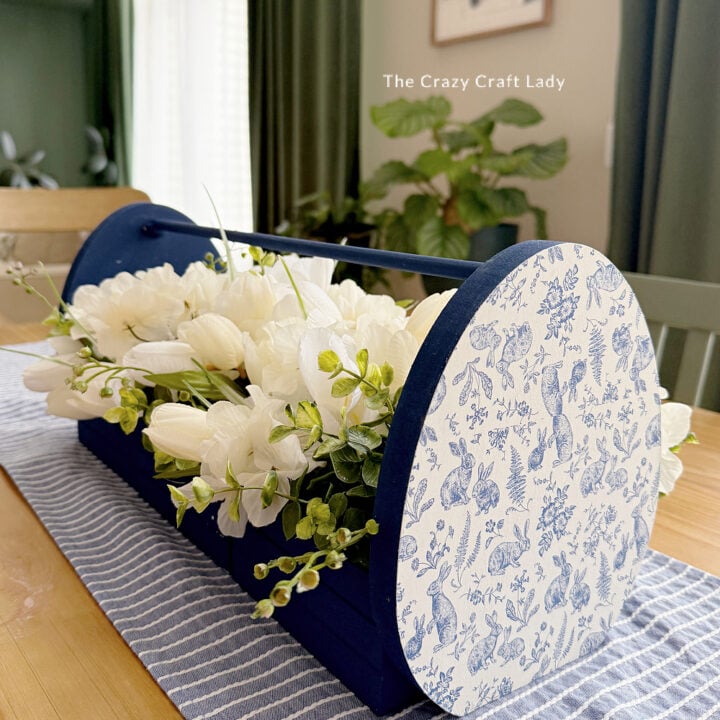
For this project, I combined six Dollar Tree mini wood crates to create a long centerpiece filled with faux florals. Then I added decorative Easter egg wood cutout end caps with a beautiful decoupage napkin technique. The final touch? A cute little toolbox-style handle that gives the whole piece a charming farmhouse look.
If you love Dollar Tree crafts, spring decor, and creative centerpieces, this one is definitely worth trying!

Video Tutorial: DIY Mini Crate Easter Centerpiece (with Decoupage Egg Cutouts)
Watch this quick video to see how this craft came together:

DIY Mini Crate Easter Centerpiece (with Decoupage Egg Cutouts)
Create a farmhouse-style spring centerpiece using Dollar Tree mini crates, Mod Podge napkins, and faux flowers. Easy and budget friendly!
Materials
- 6 Dollar Tree mini wood crates
- 2 wooden Easter egg cutouts
- Chalk paint: Navy blue (or your preferred color) and White
- Decorative paper napkins (spring or Easter themed)
- Mod Podge (matte or satin)
- Wood glue
- E6000 glue
- 1 wooden dowel (for the handle)
- 1 large wood bead (about 1 inch)
- Floral foam
- Faux florals and greenery
Tools
- Paint brushes
- Heat gun (for removing labels)
- Mini heat press or household iron (no steam)
- Parchment paper
- Clamps
- Miter shears or craft saw
- Nail file or sandpaper
- Hot glue gun
- Scissors or wire cutters (for floral stems)
- Tape
Instructions
- Watch the video. Follow along with the video tutorial for a step-by-step walkthrough of how to make your own Easter centerpiece.
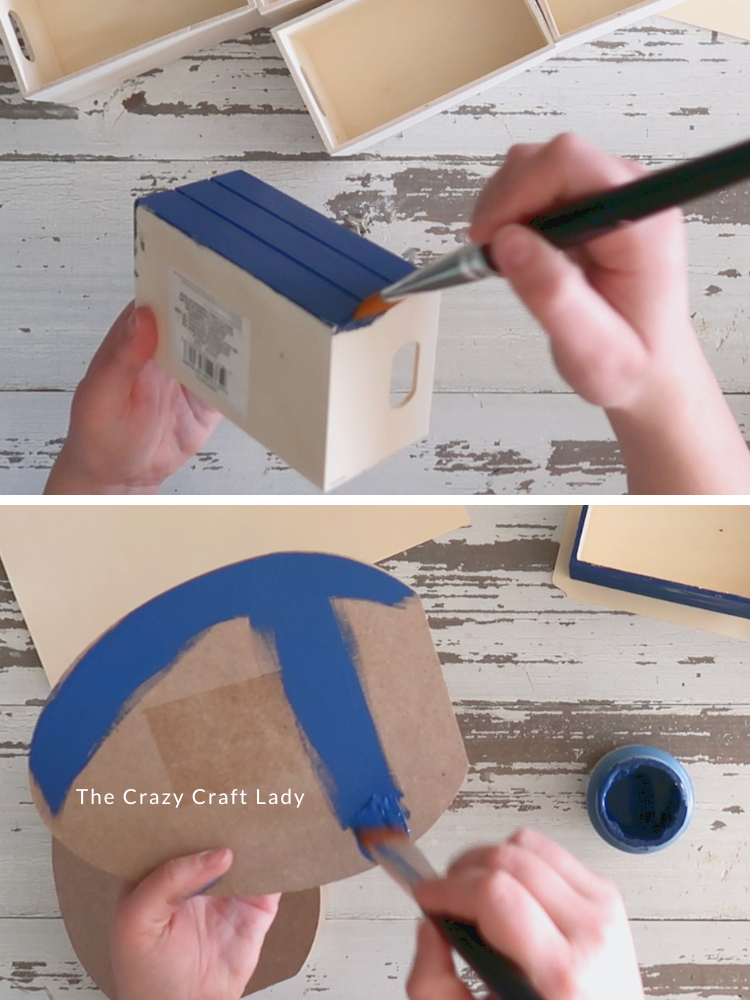
- Paint the Mini Wood Crates. Start by painting your six Dollar Tree mini wood crates in your chosen color. I used navy blue because I planned to decorate the eggs with blue-and-white napkins. Since the crates will be glued together, you don’t need to paint every side, just the outer edges that will be showing.

- Prep and Paint the Wooden Eggs. Remove the sticky labels from the backs of the wooden Easter egg cutouts using a heat gun. Paint: the edge of each egg and one flat surface. Use the same color you painted the crates (navy in my case). Leave the opposite flat surface unpainted for now. We’ll decorate that in the next step.
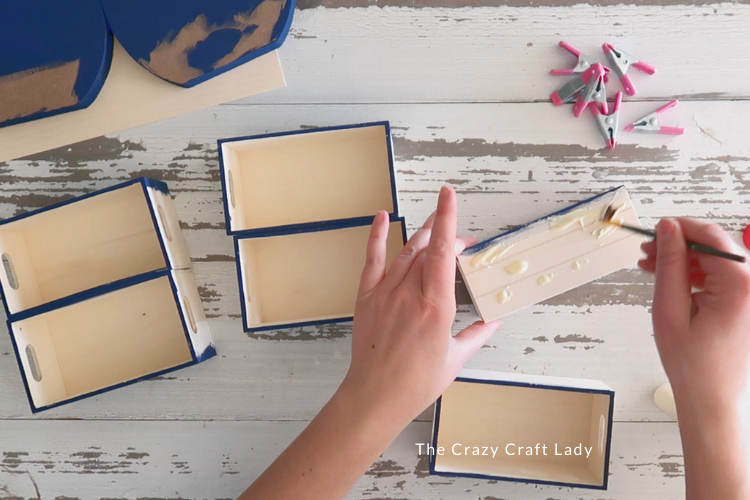
- Glue the Crates Together. Arrange the six crates in a long row to create your centerpiece base. Instead of gluing all six together permanently, glue them in three sections of two crates each. This will make the project easier to disassemble and store later. Use wood glue and clamps, and allow it to dry.

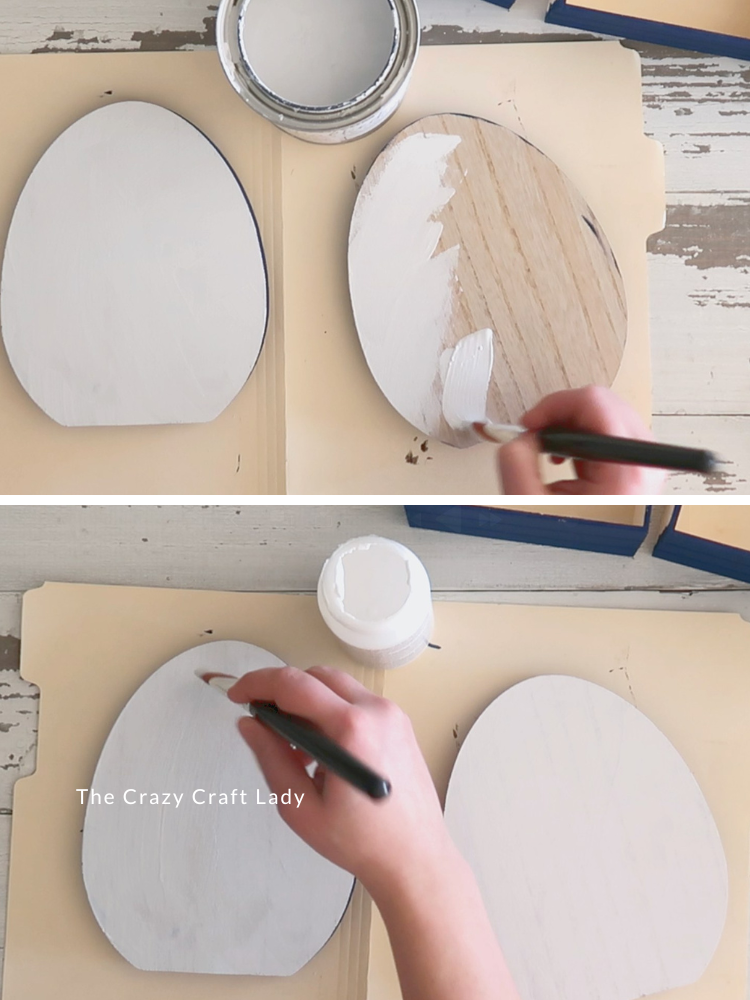
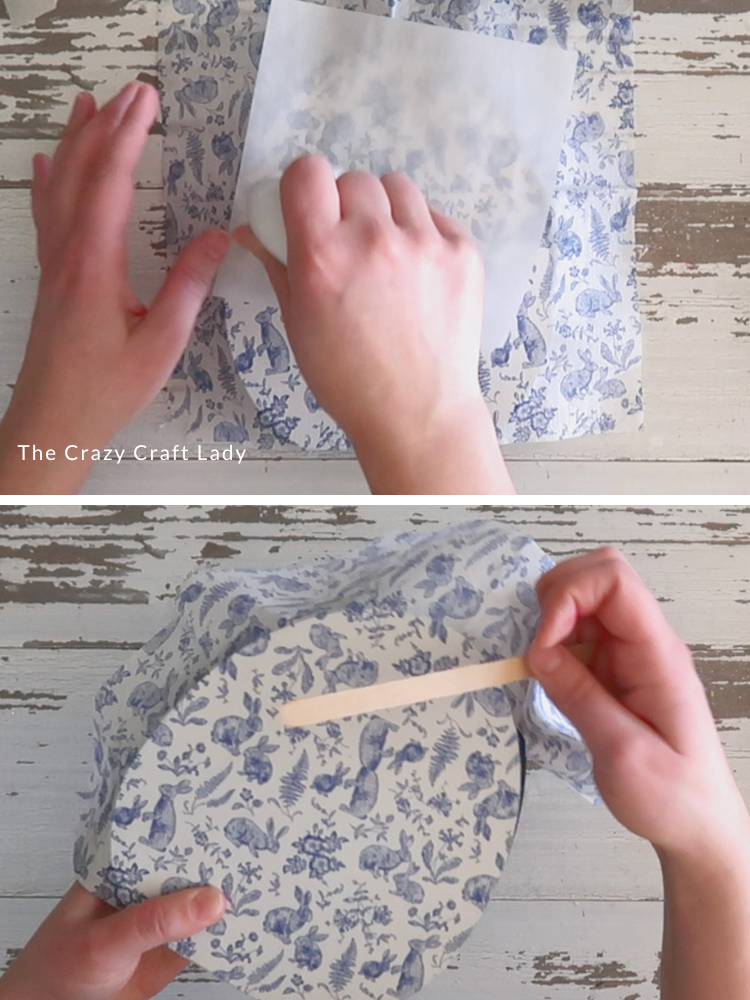
- Paint the Front of the Eggs. Paint the front surface of each egg with white chalk paint. Use brush strokes that move from the center outward so you get a clean edge against the painted border. Allow the paint to dry. Then apply a generous coat of Mod Podge over the white surface. Let the Mod Podge dry completely before moving on.
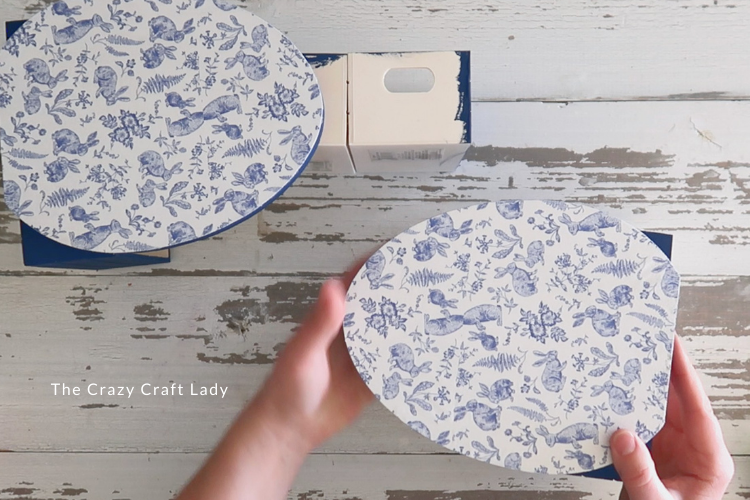
- Decoupage the Napkin Design. Separate the layers of your decorative napkin and use only the top printed layer. Place the napkin over the dried Mod Podge surface. Then, cover with parchment paper and press with a mini heat press or iron (no steam). The heat reactivates the Mod Podge underneath and creates a smooth, bubble-free decoupage finish. Once cooled, remove the excess napkin by gently sanding the edges with a Dollar Tree nail file or sandpaper. Repeat for the second egg.
- Attach the Eggs to the Crate Centerpiece Glue one egg to each end of the crate centerpiece using wood glue. Let them dry while balanced upright on the crate edges.
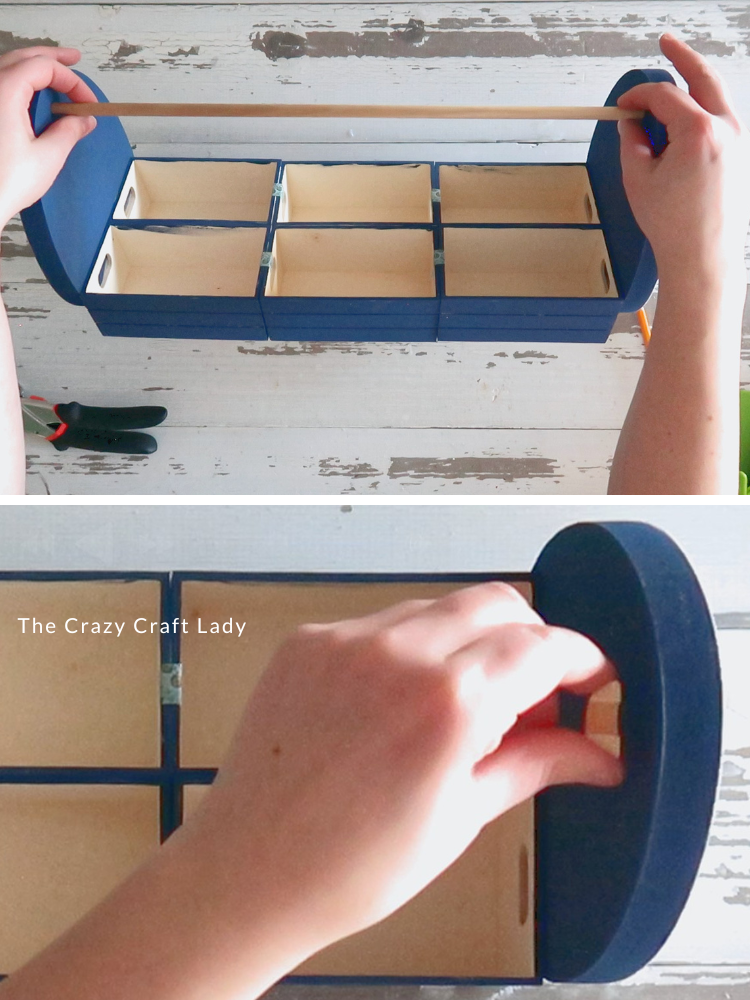
- Secure the Sections Together. When you're ready to display the centerpiece, line up the three crate sections. Run tape through the crate handles to hold the sections together temporarily. This keeps everything aligned while still allowing you to take it apart later.
- Create the Handle. To make the centerpiece look like a mini decorative toolbox, add a handle. Cut a wood dowel to the length of your centerpiece.. Cut a 1-inch wood bead into quarters. Glue the quarter pieces to the inside tops of the egg cutouts using E6000. These act as little brackets to support the handle. Paint the dowel and the wood bead pieces to match your crate color. Once dry, rest the dowel in place to form the handle.
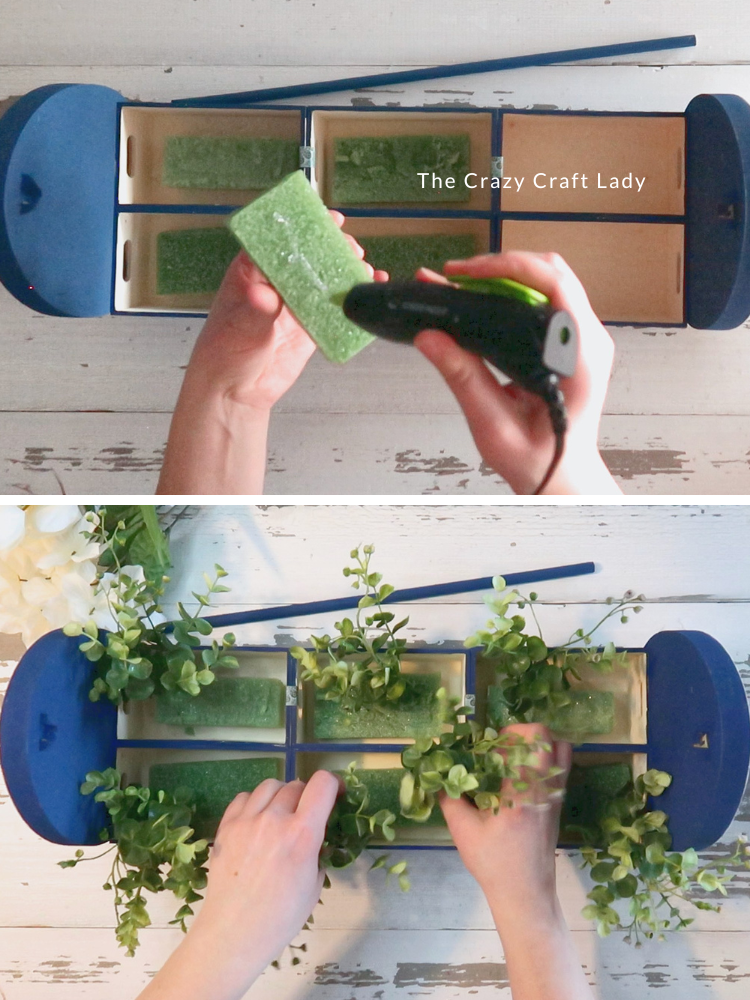
- Add Floral Foam. Cut small pieces of floral foam and hot glue one piece into each crate. This will hold your faux florals in place.
- Fill with Faux Florals. Trim floral stems fairly short since the crates are shallow. Fill the crates with: greenery and small white florals. Pack them in fairly full so the crates visually blend together into one long floral box.
Notes
Finished Spring Centerpiece
Once everything is filled with greenery, place the handle in position and admire your work!
You’ll end up with a beautiful farmhouse-style Easter centerpiece that looks like a charming floral toolbox. The blue eggs on the ends add the perfect seasonal touch, and the modular crate design makes it easy to store once spring is over.
The finished Craft

This Dollar Tree mini crate centerpiece turned out even better than I imagined. Between the decoupage eggs, the floral arrangement, and the little toolbox handle, it’s one of those projects that feels both creative and functional.
And honestly? Even the wood bead mishap was worth it in the end.
If you love Dollar Tree crafts, seasonal centerpieces, and creative DIY decor, this is a super fun project to try for spring or Easter.
Just grab a few mini crates, some paint, and your favorite faux florals—and you’ll have a beautiful handmade centerpiece for your table in no time!

PIN this craft for later:
