
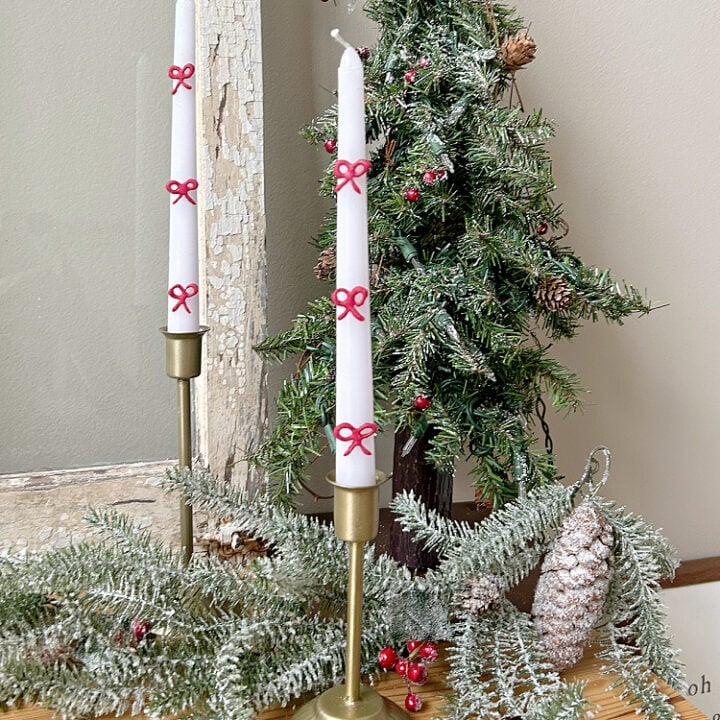
DIY Bow Taper Candles: Make your own Pottery Barn–inspired bow candles for just a few dollars! A simple hot glue and paint project that’s festive and budget-friendly.

How to make Pottery Barn inspired white taper candles with red bow details.
This post contains some affiliate links for your convenience. Click here to read my full disclosure policy.
Those adorable bow taper candles from Pottery Barn? Super cute—but definitely not super affordable. At nearly $25 for a set of two, that’s basically a week’s worth of coffee runs or a small Aldi haul. So instead of splurging, I decided to make my own DIY version for a fraction of the price.
With a little hot glue, paint, and creativity, you can craft these charming bow candles that look perfectly imperfect and totally handmade—in the best way possible. They’re festive, sweet, and just the right touch of whimsy for your holiday décor.

Video Tutorial: Red Bow Taper Candles
Watch this quick video to see how this craft came together:

DIY Bow Taper Candles
Holiday Candle DIY: Skip the $24 price tag—these handmade bow taper candles add cozy charm to your décor for a fraction of the cost.
Materials
- White taper candles (mine were from Dollar Tree)
- Red chalk paint or acrylic paint (I used Waverly Chalk Paint in “Lacquer”)
- Hot glue sticks
- Parchment paper
- E6000 adhesive (or another strong craft glue)
Tools
- Hot glue gun
- 1-inch flat paintbrush
Instructions
- Watch the video. Follow along with the video tutorial for a walkthrough on how to make your own bow taper candles.
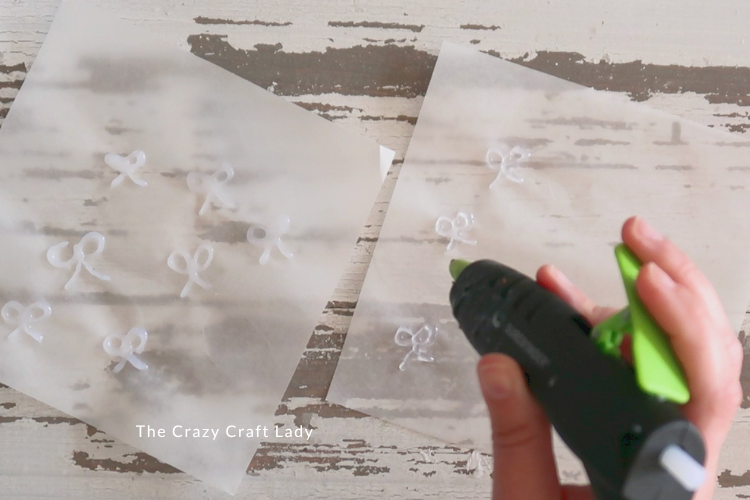
- Make the Bows. Lay out a piece of parchment paper on your workspace. Using your hot glue gun, draw small bow shapes directly onto the paper. This part definitely takes a bit of practice—don’t be discouraged if a few bows turn out wonky! Make some extras: some will be duds, but you’ll end up with enough good ones to pick your favorites later.

- Clean Up the Bows. Let the bows cool and harden completely. Once they’re set, carefully peel them off the parchment paper. Use your fingers or small scissors to trim any stringy glue bits hanging off the bows and smooth them out. The cleaner your edges, the better your finished candles will look.
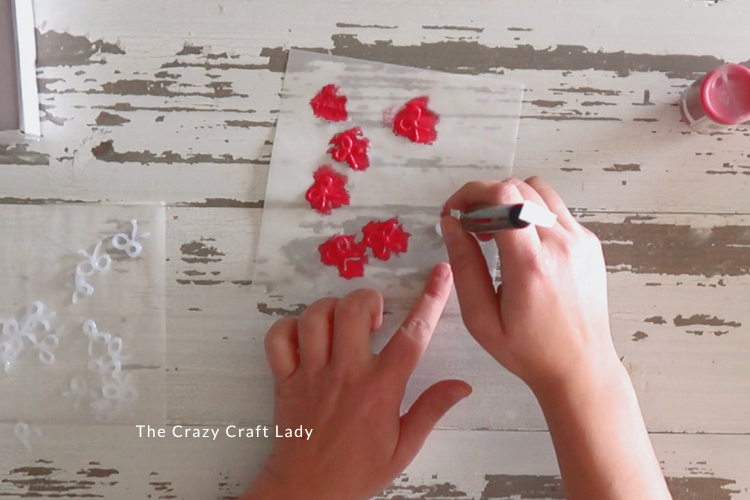
- Paint the Bows. Using a pouncing motion (instead of brushing back and forth), apply one thick coat of paint for full coverage. If you prefer a smoother finish, you can do two lighter coats instead. Let the paint dry completely before moving on.
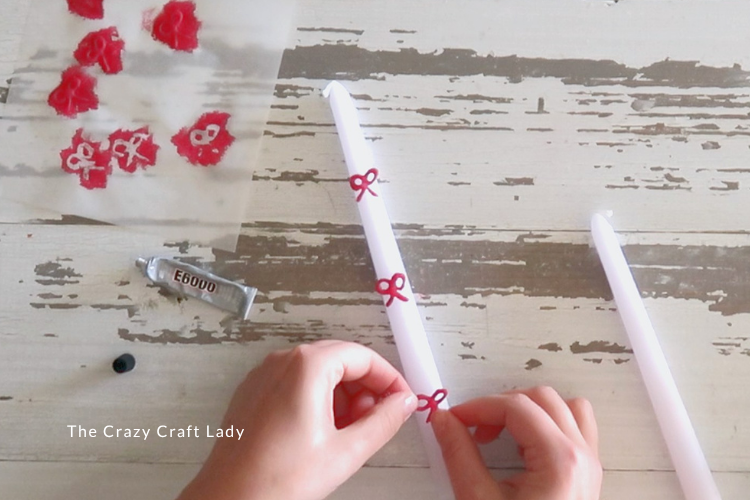
- Attach the Bows. Use a tiny dab of E6000 on the back of each bow, and gently press it onto your taper candle. Arrange the bows evenly—three per candle looks balanced and classic. Once the bows are in place, set the candles somewhere stable so they don’t roll while the glue dries.
- Display and Enjoy. When everything’s dry, your DIY bow taper candles are ready to shine! Pop them into your favorite candlesticks and admire your handiwork - you just saved more than $20 compared to the Pottery Barn version!
The finished craft

This project is proof that you don’t need a big budget for beautiful décor. With just a dollar-store pack of candles, some hot glue, and a bit of red paint, you can create your own designer-inspired candle set for less than $2.
So grab that glue gun, pour yourself a cup of cocoa, and start crafting—your holiday candles are about to get a major glow-up!
PIN these candles for later:

More Pottery Barn Candle Crafts:
This candle DIY was part of a compilation video on YouTube along with – Candy Cane Stripe Candles, Gingerbread Candle Holders, and Ornament Bowl Bell Candles. Check it out!